Now lets get to the point.
How to use this app.
Requirements:
1) A rooted phone
2) 2nd Partition in your memory card
3) Desire to install lot of your favorite apps. :)
So rooting your phone gives you lot of freedom and brings out your phones abilities to the maximum.
There are many guides available to root your phone. I am just gonna mention that here.
Note: This method is for rooting Android 2.1 phones. It doesn't workout for 2.2 and higher versions(Which i am not sure of) If this process shows up a failure then try the method mentioned at the bottom of the post for rooting.
But before you get started, don’t forget to enable USB debugging on your phone by going to Settings->Applications->Development and enabling “USB Debugging“

Also you need Android SDK kit and also latest Java version installed in your PC. You can download Java from Java's official website. Also you need to have the necessary drivers of your mobile brand upto date.
I am referring to Kies for Samsung. Sony Ericsson PC companion for SE phones. Without all the above this process wont work out.
Now we are set up to start things. Download Super One Click. Extract the zip.
Click the Super One Click icon to run it. When Super One Click launches, you’ll see several large buttons at the top of the screen. Make sure your phone is connected to the computer via USB and that the debugger can “see” it (activity will start logging). Make sure your SD card is not mounted, and go ahead and click “Root” in Super One Click.

At this point, check out the installed apps on your phone and you
should see a “Superuser” icon that looks like a Droid skull and
crossbones. If you see it, you’re rooted. If you don't , I’d suggest rebooting even if you do see it, as I
had some issues getting rooted apps to work until I actually rebooted my
own device.


Whenever you run an app that requires root (superuser), you’ll see a notification requesting permission. I like this because it also means that if an app gets installed and tries to utilize superuser access without your knowledge, it can’t.


You can also unroot the phone using the unroot button over there in Super One Click. The General fact is that your phone loses its warranty once its rooted. So to recover it you can pretty much unroot it for claiming it. So don't worry. :)
Well the above method isn't successful for Android 2.2 and higher. I am not sure of it though but here is the widely followed method for rooting 2.2 and higher phones.
For rooting Android 2.2 and higher:
Download this zip file for rooting. Root
Copy it to your memory card.
Then enter into recovery mode.
There are different methods for entering into recovery on different mobile phones. So search for your method in the internet.
Now in the recovery mode Select " Install custom zip from SD card or similar option to it and then install the zip and reboot the phone. You would have your phone rooted.
To unroot download this zip file Unroot and follow the same steps.
Now with the phone rooted the process becomes simpler.
Next is to partition the memory card.
MiniTool partition
Download Mini tool Partition &
install it on your windows machine.
Note: Format your memory card. Else this process wont work. As a word of caution, create the partitions in a fixed sequence. Don’t skip the cycle and create the other two partitions first. For some reason if you already have partitions in your SD card, delete all your partitions in the SD card until the whole SD card is a single partition on it’s own.
Note: Format your memory card. Else this process wont work. As a word of caution, create the partitions in a fixed sequence. Don’t skip the cycle and create the other two partitions first. For some reason if you already have partitions in your SD card, delete all your partitions in the SD card until the whole SD card is a single partition on it’s own.
Using this partitioning free software, right click
on the SD card’s partition and select “Resize”. Drag the slider to resize your
partition to your desired value.

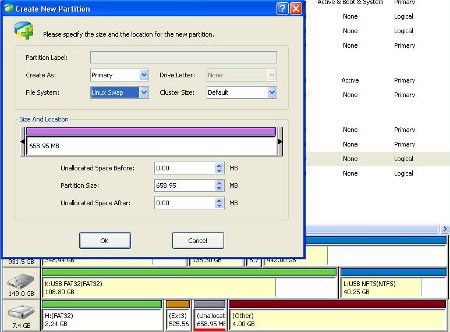
Create an Ext2 partition.
Right click on the remaining space in the SD card and create an Ext 2 partition . Choose a value that you find comfortable, depending on your size of your SD card.

Create an Ext2 partition.
Right click on the remaining space in the SD card and create an Ext 2 partition . Choose a value that you find comfortable, depending on your size of your SD card.

Finally, click on the “Apply” icon at the top left hand and allow the system to make the necessary changes.
And you’re done.
Then insert the SD card in your mobile and then install Link2SD from the market or from here.
Open the app and select ext 2 in the next dialog box and it would ask you to restart the mobile to mount the second partition. If it doesn't, then you have wrong somewhere.
After you restart, launch the app and go to settings and select auto link and in auto select settings tick all options. You will be asked for Super User permissions in between, select remember my choice and select allow.
Now you can install umpteen number of apps on your lovely android.
No comments:
Post a Comment